http://localhost:18789
安装
win
curl -fsSL https://openclaw.ai/install.cmd -o install.cmd && install.cmd --tag beta && del install.cmd

或者使用

npm install -g openclawlatest
mac
curl -fsSL https://openclaw.ai/install.sh | bash -s -- --install-method git
或者检查环境,使用
node -v


npm-v

git --version
有问题?去修复
npm list -g --depth=0
https://platform.deepseek.com/api_keys
http://127.0.0.1:18789/token=5ed65191dbbdd09848e09dfc28450b2803f0c51b00e58b51
openclaw onboard   # 查看和配置

openclaw gateway install

openclaw gateway restart


openclaw models status
openclaw models list # 或查看是否有本地模型选项

openclaw doctor --fix


最佳的一键诊断报告,包含所有状态信息 openclaw status --all

检查守护进程和 RPC 连接状态 openclaw gateway status


自动修复常见配置问题 openclaw doctor --fix

这个命令会自动打开浏览器并填入 Token: openclaw dashboard
openclaw config set gateway.mode local

schtasks /End /TN "OpenClaw Gateway" 2>$null

# 重新选模型
openclaw configure --section model
{
  "version": 1,
  "profiles": {
    "default": {
      "provider": "kimi-coding",
      "model": "k2p5"
    }
  },
  "models": {
    "providers": {
      "kimi-coding": {
        "baseUrl": "https://api.kimi.com/coding",
        "apiKey": "sk-kimi-YkS6duBN0SaY73ty***********FEydX0",
        "api": "anthropic-messages",
        "models": [
          {
            "id": "k2p5",
            "name": "k2p5",
            "input": [
              "text",
              "image"
            ]
          }
        ]
      }
    }
  },
  "gateway": {
    "port": 18789,
    "host": "0.0.0.0",
    "mode": "local"
  }
}
EOF

-------------------------
cat > ~/.openclaw/openclaw.json << 'EOF'
{
  "meta": {
    "lastTouchedVersion": "2026.2.24",
    "lastTouchedAt": "2026-02-26T00:11:08.512Z"
  },
  "wizard": {
    "lastRunAt": "2026-02-26T00:10:00.282Z",
    "lastRunVersion": "2026.2.24",
    "lastRunCommand": "doctor",
    "lastRunMode": "server"
  },
  "models": {
    "providers": {
      "kimi-coding": {
        "baseUrl": "https://api.kimi.com/coding",
        "apiKey": "sk-kimi-YkS6duBN0SaY73tyKLmTZ*************ydX0",
        "api": "anthropic-messages",
        "models": [
          {
            "id": "k2p5",
            "name": "k2p5",
            "input": ["text", "image"]
          }
        ]
      }
    }
  },
  "agents": {
    "defaults": {
      "compaction": {
        "mode": "safeguard"
      }
    }
  },
  "commands": {
    "native": "auto",
    "nativeSkills": "auto",
    "restart": true,
    "ownerDisplay": "raw"
  },
  "gateway": {
    "port": 18789,
    "mode": "server",
    "auth": {
      "mode": "token",
      "token": "8ccd61d43e4af4ec17480bc000b50776fa33b712ccd255e7"
    }
  }
}
EOF


nano ~/.openclaw/openclaw.json

直接编辑它,真强

openclaw gateway --port 18789
deepseek
提示词: “ https://tophub.today/n/mproPpoq6O”“
openclaw tui
https://pc.ctyun.cn/#/wall
中文汉化版本的真好
https://openclaw.qt.cool/
如果怎么该都不行 那就用汉化版
否则使用 国际版本的
https://blog.csdn.net/xianyu120/article/details/157940729
技能包
https://www.clawhub.ai/skills
https://github.com/VoltAgent/awesome-openclaw-skills?tab=readme-ov-filebrowser--automation
飞书
npm install -g openclaw/feishu


openclaw plugins list

openclaw plugins enable feishu
企业微信
https://juejin.cn/post/7606923064946049064
openclaw config wecom \
  --corp-id YOUR_CORP_ID \
  --agent-id YOUR_AGENT_ID \
  --secret YOUR_SECRET \
  --token YOUR_TOKEN \
  --aes-key YOUR_AES_KEY
历览器
openclaw config set browser.executablePath "/usr/bin/google-chrome"


openclaw browser extension install


chrome-extension://eamfdnmkfcpmgeeeiomloolflpglkjof/options.html    url
telegram
第一步:创建 Telegram Bot,获取 Token
打开 Telegram(手机或电脑版都可以)
搜索 BotFather(注意:必须是这个名字,有蓝色认证标识)
点击"开始"或发送 /start
发送命令 /newbot
BotFather 会问你起名字:
Full name(完整名称):随便起,比如 My AI Assistant
Username(用户名):必须以 bot 结尾,比如 my_ai_bot
成功后,BotFather 会发给你一段 Token(看起来像 7123456789:AAEBcd...)
立刻复制这个 Token! 这是你的 Bot 的"密码",妥善保管。
2 重启网关 openclaw gateway restart
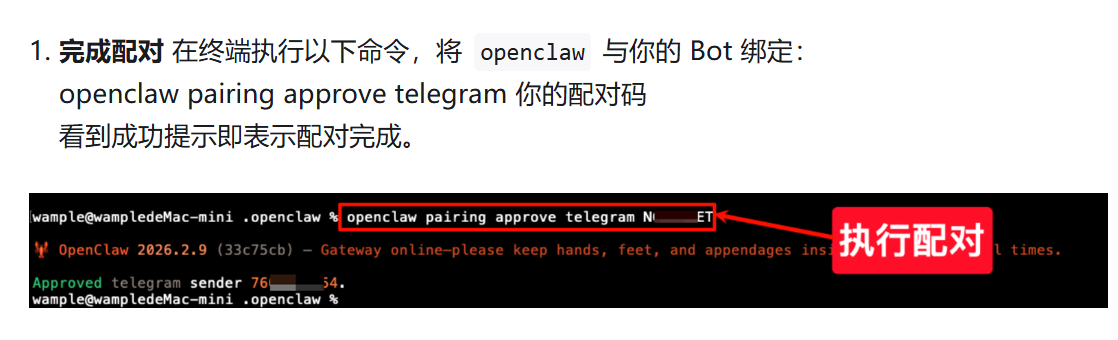
在 Telegram 搜索你刚创建的 Bot 用户名(比如 my_ai_bot),点击"开始",发送一条消息。
第一次发消息时,你会收到一个配对码。这是安全验证,需要你在终端批准:
openclaw pairing list telegram # 查看等待批准的请求
openclaw pairing approve telegram <CODE> # 批准(把 CODE 替换成实际的码)
批准后,再发一条消息,AI 助手就会回复了!
refer 接入 Telegram(推荐新手) | OpenClaw 中文文档
查找你的 Telegram 用户 ID
更安全(无第三方机器人):
- 启动 Gateway 网关并私信你的机器人。
- 运行
openclaw logs --follow并查找from.id。
备选(官方 Bot API):
-
私信你的机器人。
-
使用你的机器人 token 获取更新并读取
message.from.id
:
curl "https://api.telegram.org/bot<bot_token>/getUpdates"
第三方(隐私性较低):
- 私信
userinfobot或getidsbot并使用返回的用户 id。
停止
openclaw gateway stop
飞书
参考 oneclaw 聊天集成:飞书机器人配置教程 — OneClaw
https://docs.openclaw.ai/zh-CN/channels/feishu
chrome-extension://eamfdnmkfcpmgeeeiomloolflpglkjof/options.html
···
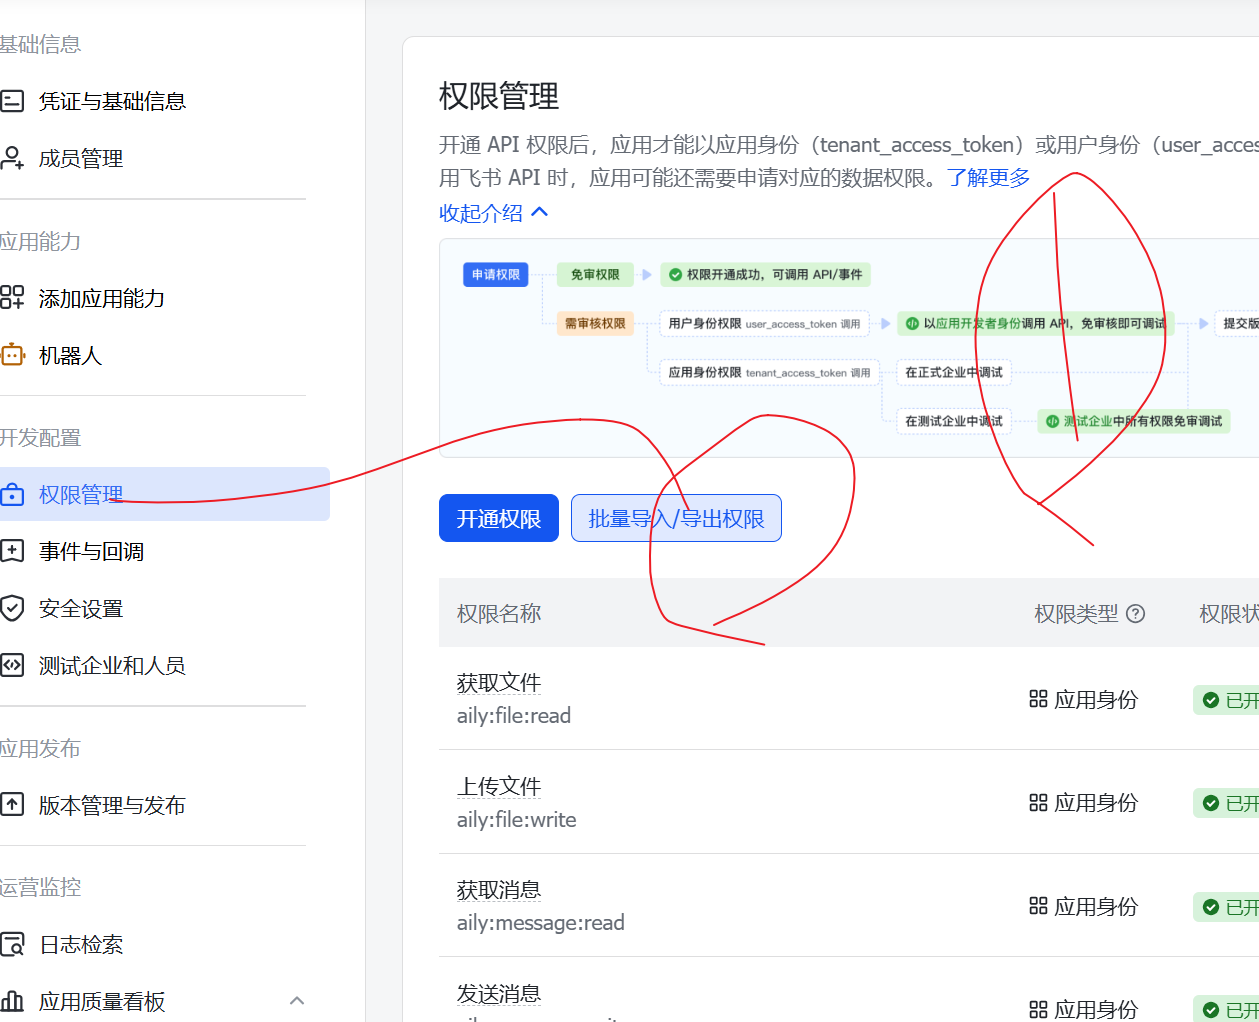
{
  "scopes": {
    "tenant": [
      "aily:file:read",
      "aily:file:write",
      "aily:message:read",
      "aily:message:write",
      "aily:run:read",
      "aily:run:write",
      "aily:session:read",
      "aily:session:write",
      "aily:skill:read",
      "aily:skill:write",
      "contact:contact.base:readonly",
      "im:chat:readonly",
      "im:message",
      "im:message.group_at_msg:readonly",
      "im:message.p2p_msg:readonly",
      "im:message.reactions:read",
      "im:message:readonly",
      "im:message:recall",
      "im:message:send_as_bot",
      "im:message:send_multi_depts",
      "im:message:send_multi_users",
      "im:message:send_sys_msg",
      "im:message:update"
    ],
    "user": [
      "contact:user.base:readonly"
    ]
  }
}
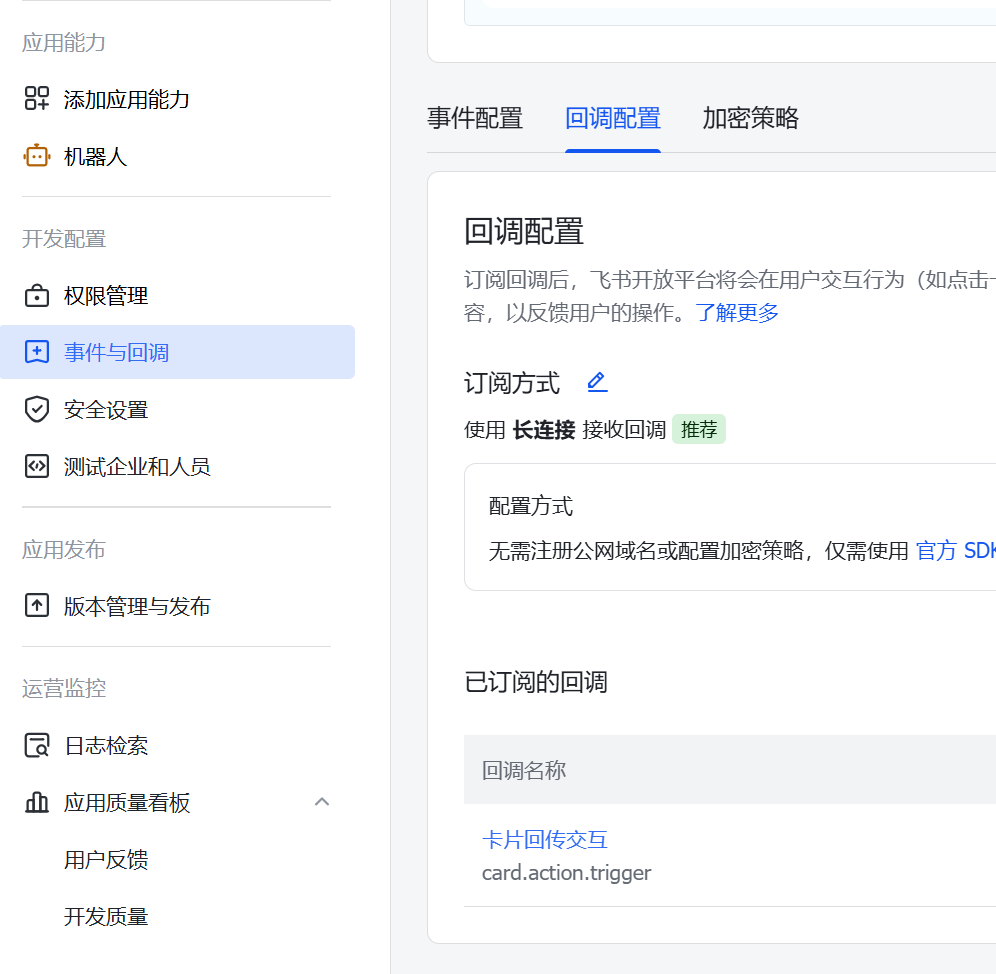
要发布以后 才可和后续操作两个长连接。
unbuntu
sudo apt update
sudo apt install git -y
安装NVM(Node版本管理工具):
- 国内服务器(使用Gitee镜像源):
bash
  curl -o- https://gitee.com/RubyMetric/nvm-cn/raw/main/install.sh | bash
- 海外服务器(使用官方源):
bash
  curl -o- https://raw.githubusercontent.com/nvm-sh/nvm/v0.39.1/install.sh | bash
- 重新加载环境变量:
bash
   source ~/.bashrc
- 安装Node.js 22版本:
bash
   nvm install 22
乌班图保活技术
# 先停止现有的
openclaw gateway stop

# 方法1:用 nohup 后台启动
nohup openclaw gateway start > ~/openclaw.log 2>&1 &

# 方法2:或者用 systemd(推荐)
openclaw gateway install --force
飞书-linux
https://developer.aliyun.com/article/1709755
openclaw config set channels.feishu.appId "cli_a7359-----00c"
cli_a73------100c pkfdOY7nL8K---------hC
openclaw config set channels.feishu.appId "cli5---------9100c"

cli_------------100c

# 设置App Secret
openclaw config set channels.feishu.appSecret "pkfdOY7nL8Ko9AWIPtyYqgCTEotII8hC"
# 启用飞书通道
openclaw config set channels.feishu.enabled true
# 使用websocket连接模式
openclaw config set channels.feishu.connectionMode websocket
# 单聊策略:需配对
openclaw config set channels.feishu.dmPolicy pairing
# 群聊策略:白名单
openclaw config set channels.feishu.groupPolicy allowlist
# 需机器人才能触发响应
openclaw config set channels.feishu.requireMention true

最后重启再生效
sudo systemctl restart openclaw-gateway && sleep 2 && sudo systemctl status openclaw-gateway --no-pager

最后记得回调
openclaw pairing approve feishu T3MDR7Y9
sudo apt install -y curl wget git vim build-essential python3 g++ make ca-certificates gnupg


# 前台启动(可以看到日志)
openclaw gateway --port 18789

# 然后在另一个终端窗口运行
openclaw tui
飞书 Docs Link: https://my.feishu.cn/wiki/PRyZwCPkSiEWzckYWkEcr5TenFd Password: Cgg123123


# 一键测试

echo "=== Gateway 状态 ===" && sudo systemctl status openclaw-gateway --no-pager && echo "" && echo "=== 端口监听 ===" && ss -tlnp | grep 18789 && echo "" && echo "=== 最新日志 ===" && sudo journalctl -u openclaw-gateway -n 5 --no-pager
openclaw-企业微信-linux
https://developer.aliyun.com/article/1712881
opencode
npm install -g opencode-ai
/connect
https://open-code.ai/zh/docs
https://juejin.cn/post/7594813727053905954
api -
开源OpenClaw插件,让OpenClaw直接使用opencode的免费模型 - 资源荟萃 - LINUX DO
根据文章内容,我为您总结出必要的OpenCode安装和使用命令:
OpenCode 安装命令
Windows
npm i -g opencode-ai
macOS/Linux
curl -fsSL https://opencode.ai/install | bash
其他安装方式
# 使用 bun
bun add -g opencode-ai

# 使用 brew
brew install opencode

# 使用 paru
paru -S opencode
OpenCode 使用命令
基础命令
# 启动 OpenCode
opencode

# 初始化项目(扫描代码结构)
/init

# 查看可用命令
/

# 切换模型
/models
模型选择建议
- GLM-4.7:Claude平替,代码写得好,自愈能力强(国内模型,不要开梯子)
- Big Pickle:复杂逻辑推理,解决Bug效果好
- Grok Code Fast 1:快速迭代,响应速度快
注意事项
- 使用
/init时需要开梯子(连接github和cursor) - 国内模型(如GLM-4.7)使用时不要开梯子
- 首次启动需要配置API Key
推荐替代方案
根据文章实测,作者推荐上一期的 Aider + 阿里云API 方案:
- 全程不用开梯子
- 配合VSCode开发体验更好
- 国内零门槛白嫖AI编程
支付
为了买tokens 吧
觉得不如 safepale ,备选项嘛 无所谓啦